If you like what you see here, like me on facebook and follow me on twitter for more tips and to follow what is going on at the Home Front!

Showing posts with label Self-Reliance. Show all posts

How to Make and Can Old Fashioned Pickled Beets!

By Stephanie Dayle
I originally wrote and published this article for American Preppers Network and have moved it here to my personal site and updated the information, of course with permission. 

It’s that time of year when the beets in your garden should be finishing up. When I was a kid our choices were to eat them fresh, which I loved, or pressure can them, and I despised eating canned beets. They were the source of many late nights at the dinner table while I stared down the “you may not get up until you eat your beets” ultimatum.
As an adult I learned that they could also be pickled, my mom was not fond of pickled beets so she never preserved them that way (you can also dehydrate them but that’s another article). I love old fashioned pickled beets, they are by far one of my most favorite snacks and side dishes! They are a far cry from their pressure canned counterparts. Want to try something unique? Slice them thinly (or 'french' them if you are familiar with that slicing technique) and apply them to a sandwich featuring cured meat, like salami.
And by “old fashioned” I mean they are pickled using a sweet brine with traditional ingredients. 
Row-of-beets.jpg
Row of beets

Why Grow Beets?
For some beets are an acquired taste - like coffee or beer. This means you should keep trying them even if your first impressions weren't really good. The taste will grow on you, as your taste buds learn to appreciate the flavor. Why bother? Because they are a great survival food in your garden to name just one reason, so keep reading oh great finicky one.
Beets are a quick growing, hardy root vegetable. They are cold hardy so beets are a great crop to get in the ground as soon as possible for an early harvest giving you food when nothing else is ready yet. Beets can be steamed, roasted (my favorite), grilled, shredded for salad, and of course they can be preserved by being canned or pickled. 
They are also packed with potassium, magnesium, folate, and B vitamins! In other words, they are really good for you (and for any of you who are a possible 'mom-to-be'). Beets are also really good for livestock and are often fed to cattle, horses, and are also good for chickens. The greens are completely eatable and are often prepared like ‘collard greens,’ beets can also be juiced or dehydrated. Pigs, cattle, chickens and horses also enjoy the greens so nothing goes to waste. Click here for heirloom beet seed.
Here is a quick ‘how to’ on canning pickled beets!

Canning Pickled Beets

(recipe courtesy of the Ball Blue Book)
b2ap3_thumbnail_ingred.jpg

  • 3 quarts beets (double recipe if you have more)
  • 2 C sugar
  • 2 sticks cinnamon
  • 1 Tbsp whole allspice
  • 1/2 Tbsp of whole cloves (I add this is variation of the recipe)
  • 1 1/2 tsp salt
  • 3 1/2 cups vinegar (use cider vinegar)
  • 1 1/2 C water


b2ap3_thumbnail_Washing.jpg
Remove tops and roots, then wash beets.
b2ap3_thumbnail_Canner-of-Beets.jpg
To peel beets: Cook beets for 20-30 in a large stock pot or canner (like pictured above), until you can just barely stick a fork them, then run them under cold water or stick them in a tub of cold water and peel them easily with your hands. 

  • Wash beets, cook beets, peel and then quarter beets.
  • Combine everything except beets in large sauce pot.
  • Bring to boil, reduce heat and simmer for 15 minutes.
  • Remove cinnamon sticks.
  • Pack beets into hot jars leaving 1/4″ headspace.
  • Ladle hot liquid over beets leaving 1/4″ headspace.
  • Remove air bubbles, then add lids and bands.
  • Process for 30 minutes in a hot water bath canner.
  • Yield: Approximately 6 pints or 3 quarts.


b2ap3_thumbnail_brine.jpg
All ingredients combined and simmering – this is the sweet brine ready to go!
b2ap3_thumbnail_Jars.jpg
Sterilized jars filled with peeled beets – ready for the brine.
b2ap3_thumbnail_canner.jpg
Water bath canner full of jars.
b2ap3_thumbnail_beets-finished.jpg
Finished product.
**This recipe and process is approved for safety – I even asked the WSU Extension Office if adding a few cloves was ok – they said it would not alter the safety of the recipe. Many people have written articles about pickling beets on the internet, any similarities are merely coincidence.**

Consider raising meat chickens


By Stephanie Dayle via The American Preppers Network  (I wrote this originally for the American Preppers Network - and have since moved it here to my personal site with updated information)

I would like to take a stab at convincing anyone who can, to raise meat chickens. Not so much for the sake of prepping, but for the sake of self-reliance, although, you can never go wrong learning to raise your own food as an emergency preparedness skill. If you are a meat eater, like me, raising meat chickens reconnects you to your food supply and increases your level of self-reliance.

All Photos (c) Stephanie Dayle 2014
It makes you fully realize the work, the love, and the effort that goes into your food. I understand a lot of you live in the city and are only allowed to have a limited number of chickens, if any at all, so I respect your decision to keep only laying hens. But, if you do live where it is allowed and you have the space please consider giving it a try. All things are connected and you can fully appreciate it, when you see it, do it, and smell it first-hand.

Raising one batch of your own meat chickens will make you think twice about reaching for that hormone enriched wrapped chicken meat on the shelf. Not because you feel sorry for it, but because for the first time you truly know that your chicken tastes like real chicken, and you may begin to wonder why that chicken on the shelf does not. You may start to compare the life your chickens lived to those of commercially raised ones.

My meat chickens live a pampered happy life; and are not 'easy' to care for. When asked by my friend, "How can you work so hard for something you are just going to kill in the end?" My answer is, "I live in service to my animals as they will die in service to me."

How to Begin:

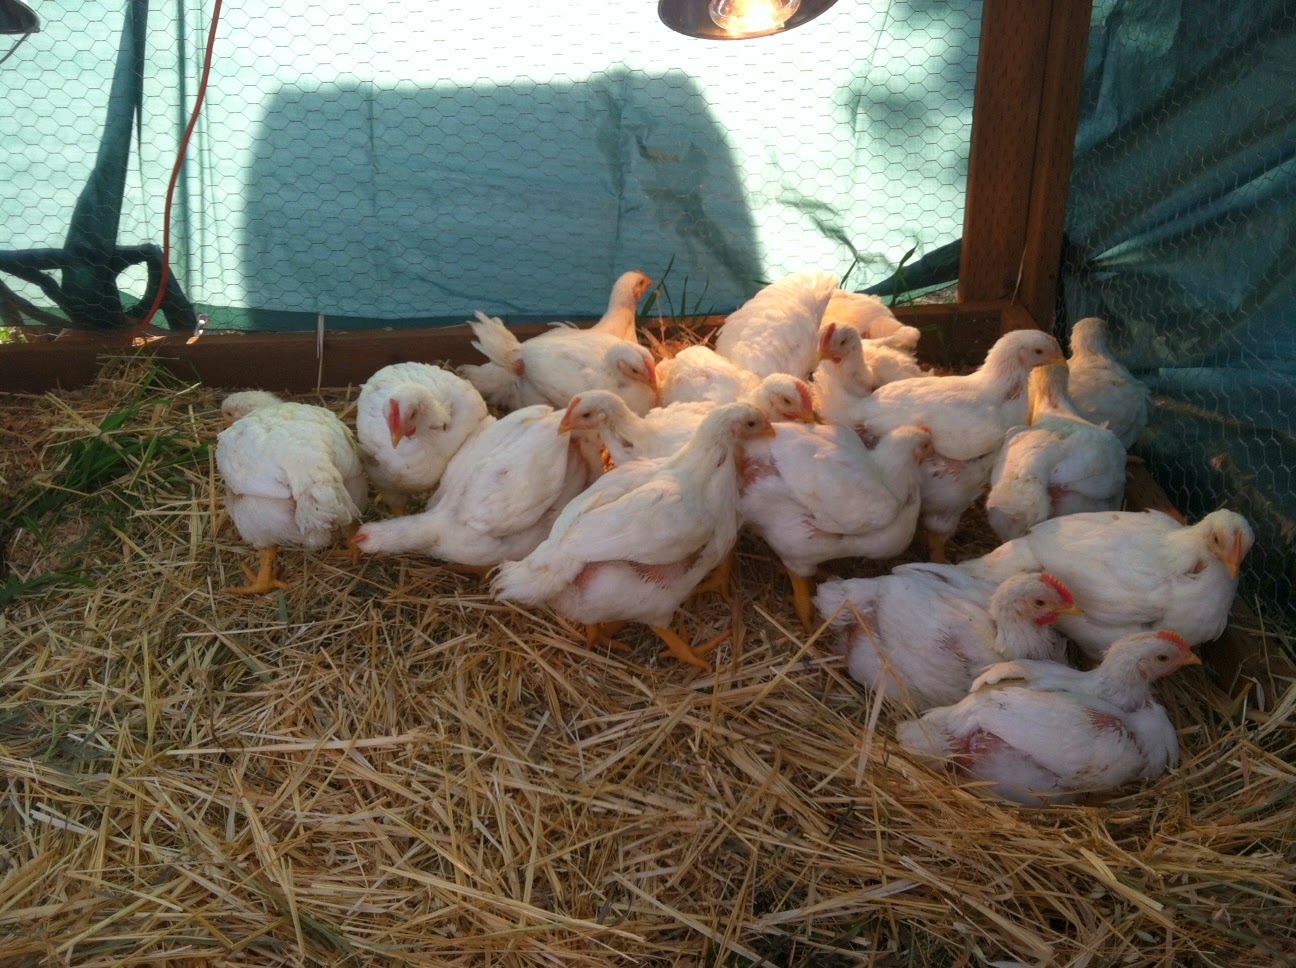
Start with a small group of meat chickens - don't worry about ordering anything fancy. When your local feed store gets some Cornish cross chicks in go get a handful of those, if you want five chickens to put in your freezer get six or seven of them because a chick or two may die despite your best efforts that's just the way it goes. If they all live, you can sell extras at market price to your friends or family and recover some of your costs.

               All Photos (c) Stephanie Dayle 2014
Cornish cross chicks are one of the most popular breeds to get for meat chickens, are widely available and usually inexpensive. Try to keep costs under $10 per bird (that includes the chicks, shipping, AND feed). The cost of the chick matters; think of this not as a hobby, but providing for yourself on a very limited budget.

There is so much negative information on the internet on this type of chicken that I often see first time meat chicken buyers skip over them. The truth is, they are probably the easiest and cheapest to raise. Most problems with Cornish Cross Chickens (technically they are a hybrid not a real breed, and therefore cannot reproduce) are caused by people waiting too long to butcher them, and/or over feeding them. An easy way to avoid overfeeding them is after they are several weeks old, to give them food during the day and remove it at night. When to butcher them is purely up to you. So if you can avoid those two pitfalls you should do really well with them.

Cornish cross birds grow fast, so it costs less to feed them - most Cornish cross birds are ready for butchering at around 8-10 weeks. This is usually a good couple weeks before other meat breeds are ready, and several months earlier (if not more) than most "dual purpose" breed birds (click here for a side by side cost comparison of Cornish Cross chicken to Dual Purpose breed chickens). After you've raised a batch and decided that you can handle the process - then explore other meat breeds, cornish cross is just the tip of the iceberg.

Cost: 

There is very little that you will need to purchase for your birds besides plenty of food, a heat light and maybe some bedding. You can make feeders and waterers from repurposed materials - to see an article on that click here. You can keep your chicks in old stock tanks, or kiddie pools, and you can make a makeshift chicken pen or chicken tractor fairly cheaply for them when they are full grown. However, in my honest opinion, free ranging these birds is over rated - these chickens are bred to grow fast off of store-bought food, not grass and bugs.

It seems to me free ranging Cornish X birds make the owners far more happy than the chickens. When I turn mine out they don't seem nearly as interested in scratching or hunting for bugs as my layer hens and they usually follow me around in hopes I will give them food, it's not going to hurt them or make them "less healthy" to keep them in a pen. Just make sure their food is of good quality and that they always have lots of clean fresh water. This breed is designed for that.

All Photos (c) Stephanie Dayle 2014


Many different Uses:

When I butcher the birds I do so quickly to minimize stress. I use a block, or a cone and I don't make the others watch. You can catch the blood in a bucket and add it to your garden. You can save all the random parts, if not for you (I so love chicken hearts, livers, and gizzards - even the feet are eatable) then for your dog or cat's food (click here for a homemade dog food recipe). Their manure is scraped from the pen and composted, then later added back into the garden which will produce some of the garden scraps I will feed to the chickens the following year.

When you cook one of your birds, you turn the carcass into chicken broth that will make lovely homemade soups and stock. The only thing left of them will be a pile of bones which you can dry in your oven or BBQ and turn into bone meal - that can also go back in the garden. Hardly anything is wasted with each part of the process supporting something else.

Long Lasting Value:

Raising your own food teaches children AND adults many lessons, some that would be invaluable during a long-term emergency. It teaches you nothing ever works right the first try and it teaches you humility and how to adapt. It teaches you responsibility and the true value of a meal. It also teaches you compassion and to be thankful for even little things, and it teaches you that even the most trusted dog can benefit from a good fence.

Meat chickens are time-consuming and just like anything else, nothing is free, and good things come with hard work. My Hubby and I both work full-time jobs and we are still able to raise a small batch of 25 and get them butchered, so maybe you can too. Start thinking about what you may need to accommodate a small batch of meat chickens in the spring. Acquire and make things slowly so you get best prices on materials, then, when March comes around and that familiar peeping sound is heard in your local feed and farm supply stores, you'll be ready.


All Photos (c) Stephanie Dayle 2014


Learn to Eat ALL of the Animal: Ox Tail Stew


Below is a Home Front Video that demonstrates "How to Process an Ox Tail" for all of you "do it yourselfers" that grow your own meat or buy it farm fresh.  Here is a TIP: If you are not doing the butchering yourself you have to specifically request that the butcher or farmer save these parts for you or they will be thrown out. Then you will most likely have to process them - like I am doing in the video - in order to eat it or freeze it.


My theory on the "Odd Parts" 

It's very important to me that I eat and use as much of the animals that I raise for food as possible. I love and care for them to the best of my ability, killing them is not easy - even if they taste good. In my opinion I would be disrespecting them and my own efforts if I threw away edible parts just because society thinks they are yucky.

 The truth is humans have eaten and enjoyed these parts for thousands of years. Originally they were eaten out of necessity (because one had to eat it), but eventually folks learned how to make them taste pretty good. This is the start of a series which will go over how to process and cook many odd parts from a beef.

 Some of these recipes I learned from my mom, some of them I found online and tweaked them until I liked them. Growing up, my family was a big believer in eating the "odd parts." Too often today when people think of beef all they think of is steaks and hamburger - maybe they think of roast if they grew up with a mom that cooked. THERE IS SO MUCH MORE to a beef than steaks and hamburger!


Ox Tail in a bowl of cool water waiting to be processed.


Cooking from scratch is a big part of "Self-Reliance" and while I have no desire to turn this into a cooking blog, I do believe there are many important lessons in self-reliance to learn through cooking. After all - what good is it to store food and grow it if you have no idea how to cook it?! And if you are going to cook it, it might as well taste good so you will want to cook it again right? So I will be including recipes as much as possible (I inevitably get asked for them anyways).

 Let's make a deal. Give these an honest try, once - in the process you will learn and prove to YOURSELF that you can do it. If you really don't like the taste of the dish - you don't have to eat it again, BUT at least you will know how to fix it if you have to and carry that confidence with you.

And as last resort, if you absolutely cannot eat Ox Tail, yet you are raising your own beef or buying it farm raised, save that part and strip the meat to give to your dog or maybe a neighbors dog. You could even make dog food out of it yourself, to learn how click here ---> How to Make and Can Dog Food! 


Ingredients:
  • 1 can of kidney beans (or the equivalent of dry beans that have been soaked overnight - more beans don't hurt)
  • 3-4 pounds oxtail
  • 1 Large sweet onion, chopped
  • 1 small bunch of chopped green onions
  • 4 garlic cloves, smashed
  • 1/2 tsp dried thyme
  • 2 tablespoons red pepper flakes
  • 4 teaspoons hot paprika (I did half smoked paprika and half reg, because I did not have hot)
  • 2 bay leaves
  • 2 tablespoons hot sauce (I used the hottest oriental chili sauce I could find)
  • 4 tablespoons gravy master
  • 6 cups beef broth (homemade is better!)
  • 4 teaspoons tomato paste (or one small can if you don't make your own)
  • Salt to taste (I used a little less than 1 TBS)

One large pot of fluffy white or brown rice.


Ready to set in the fridge overnight.
Directions:

In a crock-pot, add oxtails, onions, scallions, garlic, thyme, red pepper, paprika, bay leaf, hot sauce, and gravy master and marinate at least 4 hours or overnight in the refrigerator, stirring occasionally. I would also like to add that this also makes a GREAT dutch oven recipe - but let the ox tail marinate in a covered glass bowl overnight, then add it to your dutch oven prior to cooking.

 Add enough water to just cover the oxtails and cook on low, for 8-10 hours. Every hour or so add some water or broth, alternating, as necessary, to keep oxtails some what covered with liquid. With 2 hours of cooking time left, add the beans, tomato paste, and 2 more cups of beef broth if needed.

Simmer uncovered 2 hours, skimming fat off top and stirring occasionally. In the last 1/2 hour of cook time, season with salt. Serve with rice and enjoy. Go ahead and pick up the chunks of ox tail with your fingers and pull the remaining meat off with your teeth, I won't tell anyone! Remember hand washing before eating is golden!


Finished product should be very red from the paprika and more like a thick gravy than a stew.
This is why it is so good served over rice.


For more homesteading and preparedness tips - or just to keep up on what is going on at The Home Front! To share this post, click on the little gray the social media links below.

Pet Food for Emergency Preparedness – What to Store and How


I originally wrote this article for APN and am now moving it over to my personal site with updated information.

The best way to protect your household from the effects of a disaster is to be prepared. If you own pets you are responsible to prepare for them as well.  Many disasters could cut off your access to more pet food from the store.  A prolonged power outage could keep the stores closed, or they may already be sold out.  Storing some extra food for pets is essential for their health and well-being.

As a pet and livestock owner I have researched and tested various ways to store pet food.  The easiest approach is to store what your dog or cat currently eats, that way you can keep the food in rotation and nothing is ever wasted.  Start by building up a three-month supply of pet food and work your way up from there.  Here are some recommendations and options for storing emergency pet food.

Store Dry Kibble in the Bag 
I work right next to a Purina Mill, and have had several in-depth conversations with the employees in packaging on how to best store dry kibble.  Surprisingly, they all say the best way you can store dry kibble is right in the bag.  Here is another article (click here) which helps to explain the science behind dry pet food storage.  If you look on the back or bottom of a dry food bag you will find a ‘Best Buy Date’ or “Expiration Date”, this date could be several years out.  ‘Natural’ pet food formulas tend to not last as long due to their lack of preservatives.  The date on the back of the food bag means that the manufacturer will not guarantee optimum freshness and nutritional quality past that date.  It’s doesn’t mean that it will suddenly rot and go bad after that date.  It usually indicates that nutritional value could be lost after that point in time, therefore the goal is to use the pet food by then.
Containers:  Pet food manufactures want their product to keep as is stated on the bag or they get in trouble. So they provide you with one of the best containers for it.  The bag keeps the food dry, dark and even allows it to breathe slightly. This is important because even dry pet food contains moisture in the form of fats and oils; it is for this reason that repackaging dry pet food in Mylar or other vacuum sealed bags for long-term storage is not recommended.  Few containers and/or storage methods are appropriate for processed food which contains fat and oils.  The wrong storage container could cause a greasy film to build up on the container’s sides that will go rancid, cause the food to be distasteful and hasten food spoilage of any new food you add to the container.  Even if you seal the dry food up in bags with oxygen absorbers and silica packets the fat and oils in dry kibble will still go rancid.  
Keeping dry pet food sealed up in the bag it comes in, is the best way to preserve it.  If further protection is needed it is recommended that you place the entire unopened bag into another container like preferably a metal bin, or an airtight plastic container.  As soon as you open a bag of dry pet food oxidation starts to occur at a rapid pace, once opened, most commercial pet food will last less than six months so it’s best to use it in that time.
The best option for storing dry kibble is to build up a supply and rotate it out for use before exceeding the manufacturers date on the bag.  Use the oldest bag first and purchase new bags just like normal to replace them, rotate the older bags to the front.  Keep an eye on the food’s appearance and smell, if the kibble goes bad before the date on the bag; return the bag to the manufacturer or place of purchase. Keep dry kibble in a dark, dry area protected from extreme temperature swings.

Store Canned Pet Food 
Just like the date on the dry food bag, the date canned pet food means the manufacturer will only guarantee the nutritional quality listed up to that point in time.  Canned pet food can last anywhere from 2-5 years according to most manufacturers.  Some people claim it should be nutritionally valid for up to 10 years.
A year’s supply of canned pet food is fairly inexpensive to acquire, will last longer and takes up less space than dry kibble.  Rotate the supply by using the oldest food first and putting the new stuff in the back.  Once a supply has been acquired continue using and purchasing pet food like usual, this way you are continuously renewing your supply.  If a disaster were to strike on any given day cutting off the flow of new food, there would be still a year’s worth of stored pet food left to use.  Keep canned pet food in a dark cool area protected from extreme temperature swings.

Home Canned Dog Food
(click here for recipe)
Make Your Own Pet Food 
There are many different recipes for homemade dog and cat food available on the internet.  After all, store-bought pet food didn’t appear on the market until the 1930s so up to that point in time everyone just made their own pet food or fed their pets whatever they ate. In fact, one of the biggest trends in pet health today is organic raw diets, resulting in pet owners around the world moving away from store bought food.
One of the ways you can preserve homemade pet food is by canning it. While the resulting jar of food will be cooked and no longer raw it is still FAR healthier than it's store bought counter parts. Homemade pet food lacks many of the unhealthy additives and preservatives that most commercial pet food contains.  
The only drawback to canning pet food is that the canning recipes have not been scientifically tested for safety, so there is a greater margin of risk.  This is an option I would only recommend to someone who has had experience with canning and knows how to mitigate the risks involved with using an untested canning recipe. The running estimate for the self-life of home canned pet food is 10 years.
Another “homemade” option is just to stock extra amounts of the ingredients used to make their food.  This usually consists of rice, meat and some veggies, all these items are easy to add to long-term storage in a house or ‘bug out location’.  Just make sure there is enough food stored for both humans and animals.

Store Freeze Dried Pet Food 
Another option you may not hear about real often is freeze-dried pet food this would also be an option for Raw Diet fans.  It is usually formulated with high quality 'raw' food, and then freeze-dried for convenience and longer storage times.  Freeze-dried pet food is expensive just like human freeze-dried food is, but it could be a viable lightweight, long-term storage option for emergency pet food.  Below I have linked to a few types of freeze-dried pet food, click on the blue text to see the product.  I currently use freeze-dried dog food while camping with my own dogs so I can tell you first hand that it’s easy to prepare and they love every bite.

This is freeze-dried dog food, rehydrated.

Most of the freeze-dried pet food products available on the market would need to be repackaged in Mylar as the plastic packages it comes in are not meant for long-term storage.  Adding some oxygen absorbers and silica packets to the mix would also be a good precaution.  Unlike dry kibble, freeze-dried pet food is completely suitable for this storage method. The manufacturers were probably not thinking that preppers would stash their products away for years at a time, so repackaging is necessary.

Word to the Wise on Raw
While raw diets can be a challenge to prep for there are a couple of options available. Not prepping for your pet because they are on a raw diet and it is too expensive or bulky is irresponsible. I am pretty sure store bought or cooked food would be more healthy for your pet than starvation. 
As the owner of three very large dogs I combine several of the above options for our pet food storage because I like having a plan B, C, and sometimes D.  Doing what works best for your situation and storage space while making sure your pets are taken care of is key.  Hopefully this information makes setting aside and storing extra food for pets a little more doable and less confusing.

Click here for another article on Emergency Preparedness Plans for Pets.


How to Cook on a Wood Stove


Written and lived by Stephanie Dayle - this is an article that I originally wrote over at the American Preppers Network published March 2013 - I have now have brought it over to my own site.


Wood stove cooking is a great self-reliant skill to learn so if the power ever goes out you can seamlessly transition to it. Wood stove cooking saves money on power, and makes some of the most wonderful home cooked meals!

Wood stove cooking is something we did when I was a kid. I grew up 15 miles outside of a small rural town, the power lines were old, pre-World War II, I was told. The power would go out during storms in the winter and during storms in the summer, sometimes for seemingly no reason at all. The longest outage I can recall was over two weeks, but it was never an 'emergency,' and life went on. This may sound backwards to some people, but to us it was normal. During these times I helped my mother cook soups, stews, casseroles, French toast and pancakes all on our wood stove.

As an adult living in a rural area, it was really important to us that we have wood heat. It's an ideal source of back-up heat and it provides an element of self-reliance that was a must for us. Since few newer homes come with wood heat anymore it was necessary to install a wood stove when we purchased our property.
I happen to prefer the performance and versatility of a standalone wood stove (see picture on left) and they are usually very easy to cook on so that is what we got, but you can cook on some insert wood stoves too (an insert wood stove is different from a fireplace, see photo on the right). My mother did all her cooking during power outages on the top of an insert wood stove; you just need a somewhat wide flat surface on top.

If you are fortunate enough to have wood stove heat, here is how you can get started cooking on your own stove.

Cookware
Start with some cast iron cookware. I recommend everyone having a couple of cast iron frying pans and at least one flat bottom dutch oven (also known as a kitchen oven - click here for an article on choosing and seasoning a dutch oven). Cast iron has a better heat tolerance and is kinder on heat distribution than other cookware, but if stainless is all you have you can cook with stainless steel frying pans and pots on your wood stove too. Another option is enamel cookware. Enamel cookware has a good heat tolerance, a great reputation for easy campfire cooking and cleaning. The only cookware I would avoid completely would be thin aluminum pans or Teflon. A trivet is a great tool to have to help regulate the cooking temperatures, however in a pinch, a stone tile can also be used for this purpose. Trivets are also used inside the Dutch oven to keep the food from baking to the bottom of the oven.

Stove
We have a two-step Englander free-standing wood stove. This gives me two different temperature surfaces. The top surface works better for slower cooking and the bottom surface works better for things that require more heat such as frying, boiling water, or cooking popcorn. It is a very large wood stove rated to heat 3200 square feet, it often drives us to open windows in the in the middle of the winter. As you can see in the picture we have outfitted the flue with a magnetic temperature gauge, now this not as handy as an oven thermometer, but it's better than nothing and requires no electricity. It tells me what the temperature on the outside of the pipe is.

The Fire

IMG_5418Wood stove cooking is best done on a wood stove when there is an established fire in the fire-box. When a fire is newly lit initially the stove will be too cold for cooking and then can heat up and become too hot very quickly, therefore a slower more controlled fire is usually best. To maintain a nice fire for cooking add a piece of wood or two every so often throughout the day instead of letting it burn down, and then filling the fire-box full of wood again. I have found that the ideal flue temperature for cooking is around 200-250 degrees F for our stove. Depending on the stove design and fuel being burned, each stove will be different on how it will
cook. Keep in mind the actual temperature on the inside of the flue is higher and the thermometer only reads the outside temp.

TIP: You can use a magnetic flue temperature gauge to monitor the temperature of your dutch oven - see below. Just stick it on the outside of your dutch oven and keep a close eye on it if you are wary about how hot it is getting. 

Here is an easy recipe to try on your wood stove. Other easy things you can try on a wood stove include stews, beans, pancakes, French toast, soups, and popping popcorn!

Wood Stove Dutch Oven Beef Roast (serves 4)
  • I use a 5 quart flat bottom dutch oven for my wood stove slow cooking.
  • 4-5lb Beef Roast (we used a chuck roast), the size of your dutch oven will dictate the size of roast you can use.
  • Your favorite dry rub spices (seasoning salt, pepper, garlic powder, etc...)
  • 1 TBS of olive oil
  • 1 Small onion
  • 2 - 3 Dashes of Worcestershire sauce
  • 1/2 Can of beer
  • 1/2 Cup of beef stock
  • 1/2 Package of bacon (or whatever is left in the fridge)

Instructions

Take a beef roast out of the freezer the day before you actually want to cook the roast and allow it to thaw. Do not thaw it in the microwave.

IMG_5435

An hour before cooking apply the dry rub (spices) to the entire surface area of the roast, then let it rest prior to cooking. Brown the roast with a large cast iron skillet on the stove top using a tablespoon or two of rendered lard, tallow, or your favorite cooking oil. This will improve flavor and seal in the juices. Grease will splatter on your stove; this will not hurt your stove, it is not the end of the world, and may burn off later. It gives your stove character.

IMG_5436

In the bottom of the oven place the trivet, onion, olive oil, beer, Worcestershire sauce, and beef stock.

IMG_5437

Place the beef roast in your oven sitting in those liquids on top of the trivet. Top the roast with chunks of raw bacon. Add the Dutch oven lid and closely monitor how the roast begins to cook. If it seems a little too hot add a trivet or stone tile under the Dutch oven, if it's too cold remove the stone tile or trivet, if it is still too cold, move the oven to the lower cooking surface if you have one.

Only after all the easy options have been exhausted do you tinker with the stove, closing the dampers down to lower the temperature output and opening them up to increase the temperature output. Remember wood stoves are not instant so if you open the dampers up to increase the cooking temperature, it will take some time for the temperature to actually go up, so do it gradually.

IMG_5417

Slow cook the beef roast on the stove for 6-8 hours. Think 'crock-pot' cooking. Occasionally rotate your Dutch oven to insure even cooking, try to avoid removing the lid too much. Using a meat thermometer check the temperature of the roast before declaring it done, it should read between 150-160 degrees F. Remove the roast and put it on a plate for serving.

Serve your wood stove beef roast with some homemade mashed potatoes, canned peas (which you can also cook on your wood stove) and maybe the rest of that beer! Enjoy! If you are wondering where you can get that cast iron tea kettle (click here), we use it as a humidifier while the stove is going during the winter.


Labor Day Deals For Preppers!


I love holiday weekends and not just for the time off of work either, mostly for the sales! This is a GREAT shopping weekend for preppers! Be on the lookout for the following items (got another one? Add it to the comments below so everyone else benefits from your finds!) you can pick these items up cheaper this weekend than almost any other time during the year.

Maximize your savings by buying enough to last you at least a year, until its on sale again next year insuring you don't have to pay top dollar for it. Or buy extra to prep for emergencies or both!

  • Charcoal: There are usually lots of good deals on charcoal during Labor Day Weekend check Walmart for double packs of Kingsford for $6-9. Lowes and Home Depot in my area usually have double packs of 20 lb bags for $9.97! To get the maximum storage life out of charcoal, always remember to store your charcoal some where dry in a water tight container away from moisture.


  • Bug Spray: For the home and garden, we all know that there are natural alternatives to chemicals but having some on hand to protect your food stores and family from disease might not hurt.


  • Camp Stoves and Grills: Stores like to put all their grills and camp stoves on clearance this time of year to get the summer equipment out the door so they don't have to take a loss on it. You can find the absolute best deals on them right now.

    Also keep an eye out for grilling accessories like the briquette starting cubes - that you can use to light your briquettes. They are GREAT fire starters in almost any situation for your bug out bags, they light easy and burn hot for an extended period of time when compared to other methods.

  • Propane: Those little canisters are on sale everywhere, I have price threshold in my mind (you may want to start doing this on paper, and after awhile you will just remember it) and when the price per propane canister drops below that threshold of $2.50 I buy. Not until then, because I know from shopping around a lot that they will eventually drop down to that price. I call this a "trigger price". It keeps me from impulse buying and spending too much for a certain item. I try to set a "trigger price" for most of the common things I buy.


  • End of Season Garden Supplies and Tools: Like potting soil,fertilizer, shears and containers.
    • Solar Lights: Many of these are half off, bringing the cost down to a buck or two. You can make chandeliers and lamps out of these to give you some light when there is no power. Simply charge during the day and bring inside at night, or continue to use outside to brighten your perimeter, if the situation allows for that.

      Try to purchase the solar lights that run off of the "AA batteries" - they can then act as an emergency solar battery charger for your location (just look in the top of the light before you buy). The AA solar lights will save you money in the long run as you can simply swap the rechargeable AA battery out with a new one when they stop holding a charge.


    • Canning Supplies: Bi-Mart just had their water bath canner on sale for $14.98 and Walmart also just had one on sale for $18.99 in my area.


    • Hot Dogs: I can them occasionally so its handy if you want to preserve them this way to pick them up cheaply, its amazing how many hotdogs you can fit in a one jar! On that note camping and BBQ food like: ketchup, mustard, beans, and sauce will also be sale. 
    • School Supplies: Are now on clearance almost everywhere, combine this with the weekend sale. Pick up paper tablets for less than 10 cents each, extra pencils for less than a buck, pens, erasers, pencil sharpeners, glue, tape, color construction paper, paint, and other supplies that you will miss when you can't run to the store anymore.
    • School Backpacks: Also are on clearance and many of them would make great get home bags or bug out bags for a child or teenager. If you are on a budget you may want to give the school backpacks a closer look, its always the darker less colorful ones that don't sell - the same ones that could make a good bug out bag.
    • End of Season Camping Supplies: Sleeping bags and tents are big sale items right now. A trip through the camping section is worth your time. Again, stores are going to try to get rid of their inventory because winter inventor is already arriving so there are great deals to be had.

    And last but not least don't forget to double check the ads this Wednesday/Thursday as there will be even more Labor Day deals and sale listed in the paper. Have a Great Labor Day Weekend!


    Most Popular Posts